How to Clean and Care for a Pet Carrier Safely
A dirty pet carrier can make travel stressful, smelly, and less safe for your pet. Dirt, fur, food crumbs, and accidents can build up fast, especially after trips. This guide explains how to clean your carrier, choose safe cleaners, remove odors, and know when replacement makes more sense than another wash.
Quick Answer
Clean your pet carrier after each trip and give it a deeper clean about once a month. Use mild soap, warm water, vinegar, or baking soda when the material allows it. Always rinse well and let the carrier dry fully before your pet uses it again.
Key Takeaways
- Clean the carrier after travel, accidents, illness, or strong odors.
- Check the care label before machine washing any soft-sided carrier.
- Use pet-safe cleaners and rinse every surface to remove residue.
- Let the carrier dry fully before storage or reuse.
- Replace the carrier if cracks, broken locks, weak straps, or stubborn odors affect safety.
What Materials Are Commonly Used in Pet Carriers?
When choosing a pet carrier, you need to know the common materials. The material affects comfort, cleaning, airflow, and safety.
Most carriers use fabric, plastic, metal, or a mix of these materials. Fabric carriers feel light and easy to carry, but sharp claws can damage weak seams or mesh panels.
Carriers are available in fabric, plastic, or metal; consider durability, especially against sharp claws, when choosing.
Plastic carriers give your pet more structure and support. They also clean faster because you can wipe the hard shell and rinse it well.
Metal carriers feel strong and last a long time, but they can weigh more. They also need careful drying to prevent rust on exposed parts.
Pick a carrier that fits your pet, your travel needs, and your cleaning routine. A safe carrier should feel secure, stable, and easy to keep clean.
[Products Worth Considering]

One-Handed Design: This dog training treat pouch, measuring 4.7 by 4.3 inches, easily fits in jeans or jacket pockets. It comes with a carabiner for attaching to your leash or connecting to your pet's collar. The opening is embedded with elastic metal, and it automatically closes after taking snacks, making it convenient for grabbing on the go or for short outings.
AIRLINE APPROVED CARRIER - With airline-approved design, you can take your pet to go to everywhere. This pet carrier provides two connecting loop handles for balanced carrying as a dual seat belt or luggage strap to secure transport

[PRODUCT DIMENSIONS] Pet travel carrier size : 17x11x11 inches, recommended up to 15 lb pets, it is suitable for large, medium cats and small dogs. Please don't choose your airline cat carrying case based on weight, please refer to your pet's length and height when choosing a pet carrier size.
How Often Should I Clean My Pet Carrier?
Clean your pet carrier after each travel session. You should also set a regular cleaning routine, even if the carrier looks clean.
Regular Cleaning Schedule
To keep your pet carrier in good condition, clean it at least once a month. Clean it more often if your pet sheds heavily, drools, has accidents, or travels often.
Regular care helps keep the carrier fresh and may extend its useful life. It also gives you a chance to check for cracks, loose stitching, weak locks, or damaged handles.
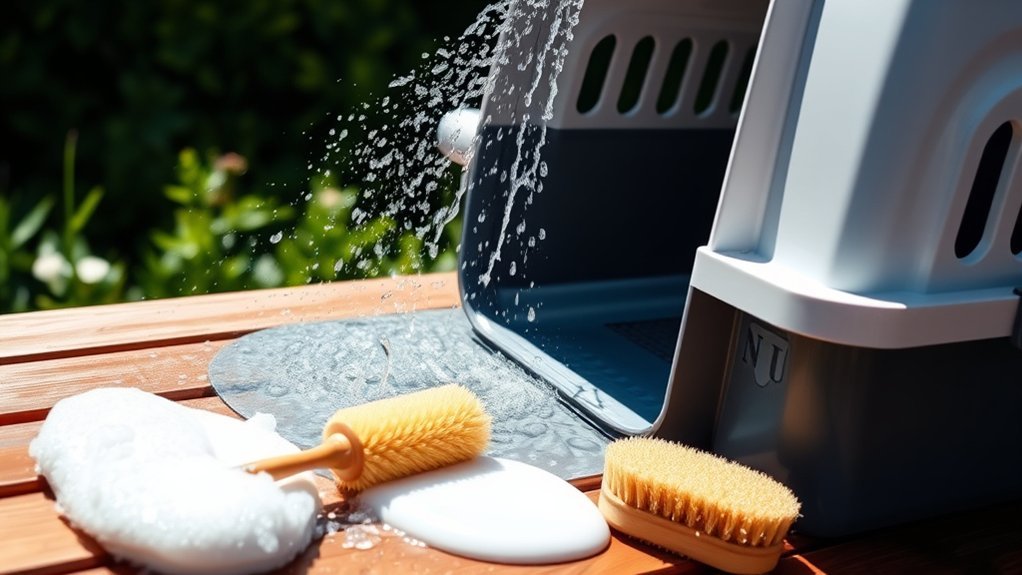
Use mild soap and warm water for routine cleaning. Avoid harsh cleaners unless the carrier label says they are safe for that material.
After Travel Sessions
After each trip, remove fur, food crumbs, bedding, and waste from the carrier. This small habit keeps odors from settling into the material.
Use a mild soap solution to wipe the inside and outside surfaces. Pay close attention to corners, seams, mesh panels, and latch areas where dirt can hide.
Rinse the carrier with clean water or wipe it with a damp cloth. Soap residue can bother your pet’s skin, paws, or nose.
Let the carrier air dry fully before you use or store it. Damp fabric and padding can trap odors and support mold growth.
Health Considerations
A dirty pet carrier can hold fur, dander, dirt, germs, and allergens. These can bother pets with sensitive skin, allergies, or breathing issues.
Clean the carrier right away if your pet has been sick, had an accident, or used the carrier at a vet office. Use a pet-safe cleaner and scrub all surfaces that your pet touches.
Warning: Never put your pet back in a carrier that still smells like cleaner or feels damp.
What Cleaning Agents Are Safe for Pet Carriers?
You can keep your pet carrier clean and safe by choosing gentle cleaners. Start with safe detergents that do not leave a strong scent or sticky residue.
Look for products labeled pet-safe or hypoallergenic. You can also use natural cleaners, such as diluted vinegar or baking soda, when the carrier material allows them.
Vinegar can help reduce odors, while baking soda can help lift light stains. Always dilute cleaning solutions, rinse well, and let the carrier dry fully.
Test any cleaner on a small hidden area first. This helps you check for fading, staining, or material damage before you clean the whole carrier.
Can I Machine Wash My Pet Carrier?
You can machine wash some soft-sided pet carriers, but not all of them. The safest answer depends on the care label and the carrier’s materials.
Material Considerations
Before you machine wash your pet carrier, check the fabric, padding, mesh, and frame. Carriers made from strong nylon or polyester may handle gentle washing better than delicate materials.
Mesh panels, foam padding, stiff inserts, and cardboard bases may bend, shrink, or break down in a washer. Always follow the manufacturer’s guidelines when you can find them.
If the carrier has a removable pad or liner, wash that part separately. Keep the main carrier out of the washer if the frame or label warns against machine washing.
Cleaning Instructions
Check the care label before you wash the carrier. Some carriers allow machine washing, while others need hand washing or spot cleaning.
If machine washing is allowed, remove detachable parts first. Close zippers, secure straps, and use a gentle cycle with mild detergent.
For regular carrier maintenance, vacuum loose debris and wipe surfaces with a damp cloth. If the carrier cannot go in the washer, soak washable parts in warm, soapy water instead.
Let every part dry completely before reassembly. This step helps prevent odor, mildew, and damp bedding.
Pro tip: Keep a small cleaning kit with mild soap, cloths, and spare liners near your carrier storage area.
How Do I Remove Stubborn Stains and Odors From the Carrier?
Start with baking soda and water for mild stains. Mix them into a paste, apply it to the stain, and let it sit for 15 to 30 minutes.
Combine baking soda and water to form a paste, apply to stains, and let it work for 15 to 30 minutes.
Wipe the paste away with a damp cloth, then rinse the area well. Repeat the process if the stain still shows.
For odor neutralization, spray a diluted vinegar and water solution inside the empty carrier. Let it sit for a short time, then wipe and air dry the carrier fully.
- Remove loose fur and debris before treating stains.
- Use baking soda paste on stained fabric when the care label allows it.
- Air dry the carrier in a well-ventilated space before reuse.
[Products Worth Considering]
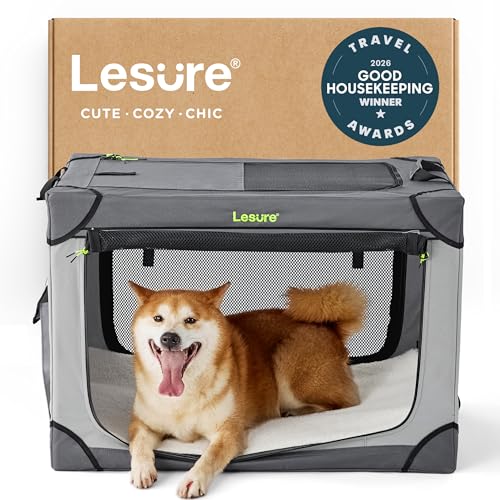
Designed for Traveling: As the recipient of a 2026 Good Housekeeping Award, this soft-sided crate features a foldable construction frame that can be easily folded into an extra compact package. It comes with a convenient storage bag, allowing you to carry it effortlessly on your outings and travels. The quick assembly in just 2 minutes and easy disassembly make it a hassle-free choice for your adventures.

Designed for Traveling: As the recipient of a 2026 Good Housekeeping Award, this soft-sided crate features a foldable construction frame that can be easily folded into an extra compact package. It comes with a convenient storage bag, allowing you to carry it effortlessly on your outings and travels. The quick assembly in just 2 minutes and easy disassembly make it a hassle-free choice for your adventures.

Designed for Traveling: As the recipient of a 2026 Good Housekeeping Award, this soft-sided crate features a foldable construction frame that can be easily folded into an extra compact package. It comes with a convenient storage bag, allowing you to carry it effortlessly on your outings and travels. The quick assembly in just 2 minutes and easy disassembly make it a hassle-free choice for your adventures.
Should I Disinfect the Carrier After Cleaning?
Disinfect the carrier after illness, accidents, vet visits, boarding, or shared use. Routine cleaning removes dirt, while disinfecting helps reduce germs on hard, washable surfaces.
Use disinfectants with care. Some products need a set contact time, and many require a clean-water rinse before your pet can use the carrier again.
Note: Vinegar helps with odor, but it may not replace a proper disinfectant when your pet has been sick.
| Disinfecting Method | Purpose | When to Use |
|---|---|---|
| Diluted Vinegar Solution | Helps reduce odor | After routine cleaning |
| Pet-Safe Disinfectant | Sanitizes approved surfaces | After illness, accidents, or vet visits |
| Mild Soap and Hot Water | Removes dirt and residue | After each trip or as needed |
How Can I Ensure My Pet Is Comfortable During the Cleaning Process?
Keep your pet away from the cleaning area while you clean the carrier. This protects your pet from wet surfaces, loose parts, and cleaning smells.
Address pet anxiety with simple comfort steps. Use calm routines that help your pet feel safe while the carrier is unavailable.
- Create a cozy retreat: Place your pet’s favorite blanket or toy in a quiet space.
- Stay nearby: Sit close and speak softly if your pet seems nervous.
- Use familiar bedding: Return clean bedding to the carrier once everything dries.
What Are the Signs That My Carrier Needs Replacing Instead of Cleaning?
Replace your pet carrier when cleaning no longer solves safety or odor problems. Damage can put your pet at risk during travel, even if the carrier still looks usable.
| Indicator | Description |
|---|---|
| Cracks or Breaks | Visible damage that weakens the carrier |
| Foul Odors | Smells that remain after deep cleaning |
| Worn Straps or Handles | Fraying, looseness, or weak stitching |
| Broken Locks or Zippers | Closures that no longer stay secure |
If your carrier shows these signs, choose a safer replacement. Your pet needs a carrier that closes securely, supports their weight, and stays stable during travel.
Frequently Asked Questions
Can I Use Vinegar to Clean My Pet Carrier?
Yes, you can use diluted vinegar to clean many pet carriers. It can help reduce odors, but you should rinse the surface well and let it dry fully.
How Long Does It Take for a Carrier to Dry After Washing?
Drying time depends on the material, airflow, and padding. Plastic carriers may dry in a short time, while fabric carriers can take several hours.
Is It Safe to Use Bleach on Pet Carriers?
Avoid bleach unless the carrier label or your veterinarian recommends it for a specific reason. If you use any strong disinfectant, dilute it correctly, rinse well, and let the carrier air out fully.
What Should I Do if My Pet Resists Cleaning?
Move your pet to a calm space before you start. Give them a toy, treat, or clean blanket while you finish the task.
Can I Clean a Carrier With My Pet Inside?
No, you should not clean a carrier with your pet inside. Remove your pet first so you can clean well and avoid stress, moisture, and cleaner exposure.
Conclusion
A clean pet carrier helps your pet travel in a safer and more comfortable space. Clean it after trips, deep clean it on a routine schedule, and use gentle cleaners that suit the carrier material.
Check for damage each time you clean, especially around locks, seams, handles, and corners. Replace the carrier when wear affects safety or odors no longer go away.
With steady care, your carrier stays ready for vet visits, road trips, and daily travel needs.
[Products Worth Considering]

Hard sided pet carrier with 1 door for front entry; suitable for a cat, dog, or other small pet

Durable Hard-Sided Protection: This hard-sided pet carrier features a sturdy plastic shell that provides reliable protection for pets during travel. The solid structure keeps your pet secure and comfortable on every trip.

20 Black Plastic Wing Nuts for Kennels