The golden hour is often hailed as the perfect time for photography, but is it truly the best? Understanding the nuances of this fleeting moment can elevate your work considerably. From the right equipment setup to the ideal angles, every detail counts. If you’re ready to reveal the secrets and avoid common pitfalls, you might just transform your approach to capturing light in its most enchanting form.
Understanding the Golden Hour
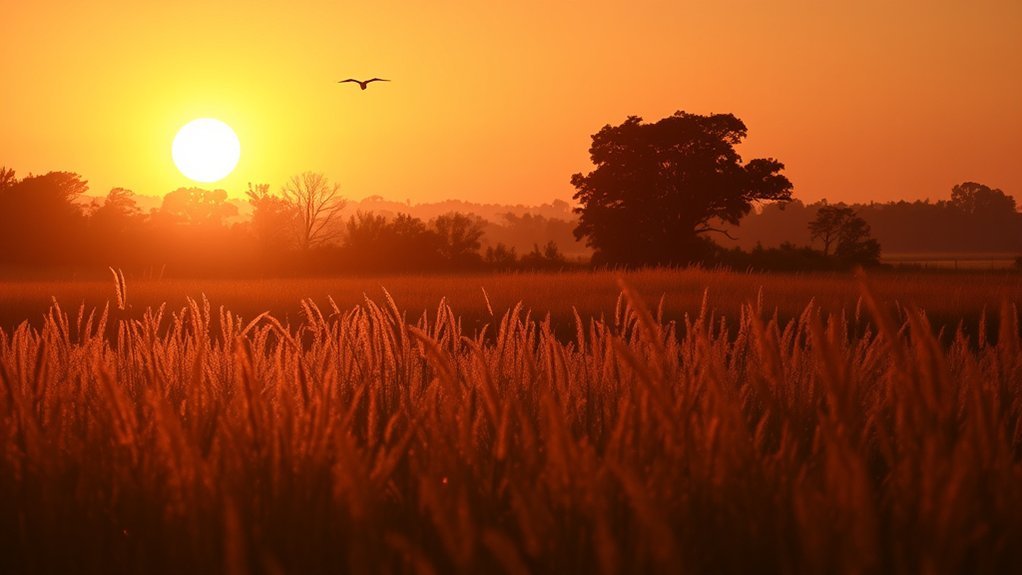
When you think about photography, understanding the Golden Hour is essential for capturing stunning images. This magical time occurs shortly after sunrise and just before sunset, when natural light transforms. During this period, the sun sits low on the horizon, creating a soft, diffused light that enhances colors and shadows.
To make the most of the Golden Hour, pay attention to the direction of the light. Position yourself to take advantage of backlighting or side-lighting, which adds depth and dimension to your shots. Avoid shooting directly into the sun, as this can lead to harsh contrasts. Timing’s vital; the Golden Hour lasts only about an hour, so plan ahead. Embrace this enchanting light to elevate your photography game.
Preparing Your Equipment
Before heading out for the golden hour, make certain your equipment is in prime shape. Check your battery levels to avoid running out of power, clean your lenses for maximum clarity, and set the correct ISO to capture the perfect light. These steps will guarantee you’re ready to seize the moment.
Check Battery Levels
Checking battery levels is essential for a successful shoot during the golden hour. You don’t want to miss those fleeting moments due to a dead battery. Before heading out, make sure your camera batteries are fully charged. Consider carrying a spare battery or two; they can be lifesavers when the light changes rapidly. Check your battery’s health; older batteries may not hold a charge as well, potentially leaving you stranded. Use a battery grip if your camera supports it, as it can extend your shooting time considerably. Finally, keep an eye on your battery level indicator during the shoot; it’s easy to lose track when you’re focused on capturing stunning images. Preparation guarantees you capture the magic of the golden hour.
Clean Your Lenses
A clean lens is essential for capturing the stunning colors and details of the golden hour. Dust, smudges, or fingerprints can distort your images, diminishing the vibrancy and sharpness you aim for. Before heading out, inspect your lenses closely; even the tiniest speck can impact your shots. Use a blower to remove loose particles, then gently wipe the glass with a microfiber cloth. If needed, apply a lens cleaner designed for optics—avoid household cleaners that can damage coatings. Always clean your lens in a controlled environment to prevent additional debris from settling on it. A well-maintained lens not only enhances image quality but also boosts your confidence as you shoot in those magical moments of daylight.
Set Correct ISO
To capture the essence of golden hour lighting, setting the correct ISO is crucial. During this time, light is soft and warm, but it can also change rapidly, so you need to adapt. Start with a low ISO, around 100 or 200, to maintain image quality and avoid noise. If light diminishes, gradually increase the ISO to 400 or 800, striking a balance between exposure and clarity. Always review your histogram: you want to avoid clipping in highlights and shadows. Remember, each camera handles ISO differently; test your gear beforehand to know its limits. By mastering ISO settings, you’ll guarantee your golden hour shots glow with that magical, ethereal light.
Planning Your Location
As you plan your location for capturing the golden hour, consider the interplay of natural light and your subject’s environment. The right backdrop can enhance your photos and create engaging moods. Here are four key factors to keep in mind:
- Background: Look for interesting textures or colors that complement your subject.
- Obstructions: Avoid locations with too many distractions that could detract from the subject.
- Perspective: Experiment with angles to see how light interacts with different elements.
- Accessibility: Make sure your location is easy to reach and safe, especially as light conditions change.
Timing Is Everything
Timing is essential for capturing the best shots during the golden hour. You’ll want to know the ideal times for shooting, as well as how weather conditions can impact your results. By understanding these factors, you can enhance your photography and achieve stunning images.
Best Times to Shoot
While the golden hour often steals the spotlight for its stunning light, understanding the best times to shoot throughout the day can elevate your photography. Here are some key moments to take into account:
- Early Morning (30 mins before sunrise) – Capture soft, diffused light; it’s perfect for landscapes and portraits.
- Midday (11 AM – 2 PM) – Use this time for high-contrast shots; shadows are harsh, but they can create striking images.
- Late Afternoon (3 PM – 5 PM) – Light softens again, ideal for vibrant colors in nature and street photography.
- Twilight (after sunset) – Embrace the cool tones and city lights; it’s an excellent time for long-exposure shots.
Weather Considerations
Weather plays an essential role in photography, so understanding its effects on light and mood can greatly enhance your shots. Overcast days diffuse sunlight, creating soft, even lighting that reduces harsh shadows and enhances colors. However, don’t underestimate the power of dramatic skies; stormy weather can add depth and intensity to your images.
Conversely, bright, sunny days can produce strong contrasts, so adjust your exposure settings accordingly. Always keep an eye on changing conditions; sudden shifts can lead to stunning, unexpected moments. Use weather apps to track conditions and plan your shoots strategically. Ultimately, embracing weather variations can elevate your photography, transforming ordinary scenes into enchanting visuals.
Adjusting Your Camera Settings
To capture the enchanting beauty of the golden hour, you need to fine-tune your camera settings for ideal results. Here are four key adjustments you should make:
- ISO: Set your ISO between 100-400 to minimize noise while maximizing light sensitivity.
- Aperture: Use a wide aperture (f/2.8 to f/5.6) to create a shallow depth of field, enhancing your subject’s focus.
- Shutter Speed: Adjust your shutter speed to 1/60 seconds or faster to prevent motion blur, especially in dynamic scenes.
- White Balance: Switch to ‘Cloudy’ or ‘Shade’ to warm up your images, capturing the rich hues of the golden hour.
These settings will help you make the most of this magical lighting, ensuring stunning photographs.
Composition Techniques
When composing your shots during the golden hour, you should utilize techniques like the Rule of Thirds, leading lines, and framing. These methods not only enhance visual interest but also guide the viewer’s eye through your images. Mastering these composition techniques will elevate your photography and make the most of that magical light.
Rule of Thirds
One of the most effective composition techniques in photography is the Rule of Thirds. By dividing your frame into a 3×3 grid, you can enhance your image’s visual appeal. Here’s how to apply it effectively:
- Position key elements: Place subjects along the grid lines or at intersections to create balance.
- Create depth: Use the grid to layer foreground, midground, and background elements.
- Guide the viewer’s eye: Direct attention to focal points by aligning them with grid intersections.
- Experiment with horizons: Instead of centering the horizon, position it along the top or bottom grid line for a more dynamic scene.
Leading Lines
Leading lines serve as powerful compositional tools in photography, guiding the viewer’s eye through the frame and creating a sense of direction and depth. You can use natural elements like roads, rivers, or fences to lead the eye toward your subject. Look for patterns in architecture or landscape that draw attention and enhance your composition. When positioning your subject, consider how leading lines can enhance the narrative of your image. Experiment with angles to discover the most impactful lines. Avoid cluttering your scene; simplicity strengthens the effect of leading lines. Remember, the goal is to create a visual journey that engages viewers, inviting them to explore the entire photograph while emphasizing your main subject.
Framing Techniques
Utilizing framing techniques can enhance your composition by adding context and focus to your subject. These techniques draw the viewer’s eye and create a sense of depth. Here are four effective framing strategies to contemplate:
- Natural Frames: Use elements like trees, windows, or arches to encase your subject, adding interest.
- Foreground Elements: Incorporate objects in the foreground to create layers and enhance depth perception.
- Symmetry and Balance: Position your subject symmetrically within the frame for harmony and visual appeal.
- Negative Space: Utilize empty space around your subject to emphasize it and create a minimalist effect.
Experiment with these techniques to elevate your photography during the golden hour and transform ordinary scenes into extraordinary compositions.
Utilizing Natural Light
As the sun begins to dip below the horizon, harnessing natural light can transform your photography, creating a warm, enchanting atmosphere. Position your subject to take advantage of soft, diffused light. The golden hues enhance skin tones and add depth to landscapes, making them more visually appealing. Keep an eye on shadows; they can either add drama or detract from your subject. Timing is vital—shoot within the first and last hour of sunlight for the best results. Use reflectors to bounce light back onto your subject, minimizing harsh shadows. Avoid direct sunlight, which can lead to overexposed highlights. By mastering natural light, you’ll elevate your images, capturing moments that resonate with warmth and beauty.
Experimenting With Angles
While you might have a favorite angle for your shots, experimenting with different perspectives can reveal unexpected beauty in your subjects. Embrace the golden hour’s soft light and try these angles to enhance your photography:
- Low Angle: Shoot from below to add grandeur and emphasize your subject’s stature.
- High Angle: Capture a bird’s-eye view to create a sense of context or vulnerability.
- Dutch Angle: Tilt your camera slightly for a dynamic, edgy effect that draws attention.
- Close-up: Focus tightly on details to highlight textures and emotions that might go unnoticed.
Avoiding Harsh Shadows
Harsh shadows can detract from the beauty of your golden hour shots, but with a few strategies, you can minimize their impact. First, consider your subject’s position relative to the light source. Avoid placing your subject directly in front of the sun, as this can create deep shadows. Instead, position them at an angle to soften the shadow’s edges. You can also use reflectors to bounce light back onto your subject, filling in those dark areas. If you’re shooting landscapes, try to shoot with the sun lower in the sky, which helps reduce contrast. Finally, keep an eye on your background; a cluttered backdrop can amplify shadow effects, so simplify your scene whenever possible.
Post-Processing Tips
After minimizing harsh shadows in-camera, enhancing your golden hour photos through post-processing can elevate them even further. Here are four key tips to refine your images:
- Adjust White Balance: Fine-tune the warmth to accentuate golden tones while avoiding unnatural hues.
- Boost Contrast: Increase contrast to make highlights pop and shadows richer, adding depth to your photos.
- Enhance Saturation: Carefully raise saturation to emphasize vibrant colors, ensuring it doesn’t become oversaturated.
- Sharpen Details: Apply selective sharpening to key areas, making your subject stand out without introducing noise.
Frequently Asked Questions
What Is the Scientific Reason Behind the Golden Hour?
The golden hour occurs due to the sun’s low angle, scattering light. This creates softer shadows and warmer hues, enhancing visual appeal. You’ll find this natural phenomenon ideal for photography and outdoor activities, maximizing your experience.
Can I Photograph During the Golden Hour on Cloudy Days?
Yes, you can photograph during the golden hour on cloudy days. The diffused light creates a soft, even illumination that enhances colors and textures, giving your images a unique, moody quality that bright sunlight often lacks.
How Does the Golden Hour Differ by Season?
The golden hour varies by season due to changes in daylight duration. In spring and summer, it lasts longer, while in fall and winter, it’s shorter, impacting light quality and opportunities for stunning photography.
Are There Specific Golden Hour Times for Different Locations?
Yes, golden hour times vary by location due to factors like latitude and time of year. Use tools like apps or websites to find exact times for your area, ensuring you capture that perfect lighting.
Is the Golden Hour Beneficial for Portrait Photography Only?
The golden hour isn’t just for portraits; think of it as nature’s soft filter. You can capture stunning landscapes, architectural details, and vibrant street scenes, all enhanced by that warm, magical light. Don’t miss it!